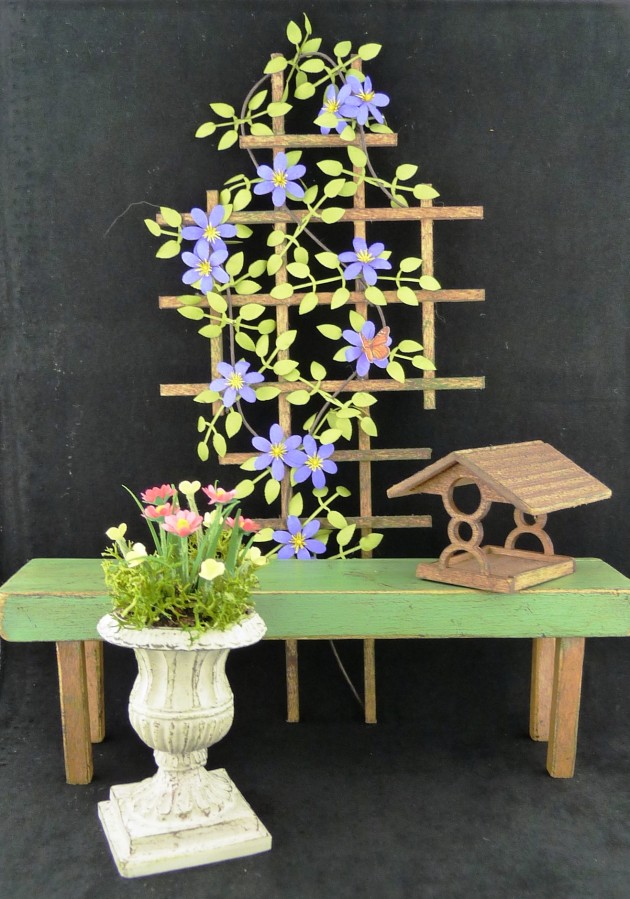
Miniatures Needed (All One Inch Scale)
Miniature Daisy House Bench Kit
Miniature Chrysnbon Chair, unfinished
Miniature Kitchen Bar Stool
Miniature Large Urn Planter
Miniature Laser Tech Bird Feeder Kit
Miniature Wooden Trellis, Unfinished
Bonnie Lavish Miniature Clematis Kit
Jeannetta Kendall Miniature Butterfly & Antennae
Some of these miniatures may be found at my Cotton Ridge Miniatures web site.
Supplies Needed
American Accents Antique Top Coat (or a light brown wood stain)
Stain Pens & Wood Stain in Cans
Wax Paper & Masking Tape
Tacky Glue
Floral Foam Block
Paper Towels
Acrylic Paint: Raw Umber, Burnt Umber, Avocado, Cadmium Yellow, Buttermilk, and various other colors
Pink Flower Petal Punches (10)
Yellow Flower Petal Punches (6)
Green Star Punches (5)
Matte Sealer
Green Paper for Leaves
Cups of Water
Green Lichen
Yellow Sand
Cloth covered green wire
Small piece of Black Floral Foam
“Dirt” (Dried used coffee grounds or Woodland Scenics Soil Material)
Large Scissors or Wire Cutters
Fan & other small Paint Brushes
Stylus (optional)
Small Scissors & Tweezers
Small Jig (optional)
Toothpicks
Emery Board
Large T-Pin
Q-Tips
Sandpaper
Foam Pad (such as a mouse pad)
Small Rag
Flower & Leaf Punches
I use scrapbooking punches found in Hobby Lobby, Michael’s Crafts and scrapbooking stores. Look for in-scale punches in flower petal and leaf shapes – don’t forget to look in the “Border” and “Corner” punches section. I use colored vellum paper found at scrapbooking & craft stores and rice paper. Cardstock is usually too thick.
PROJECT INSTRUCTIONS
Step 1. Stain & Paint
1. Tape a sheet of wax paper to your work surface to protect it.
2. Shape the aprons and legs of the bench as described in the Bench Kit instructions.
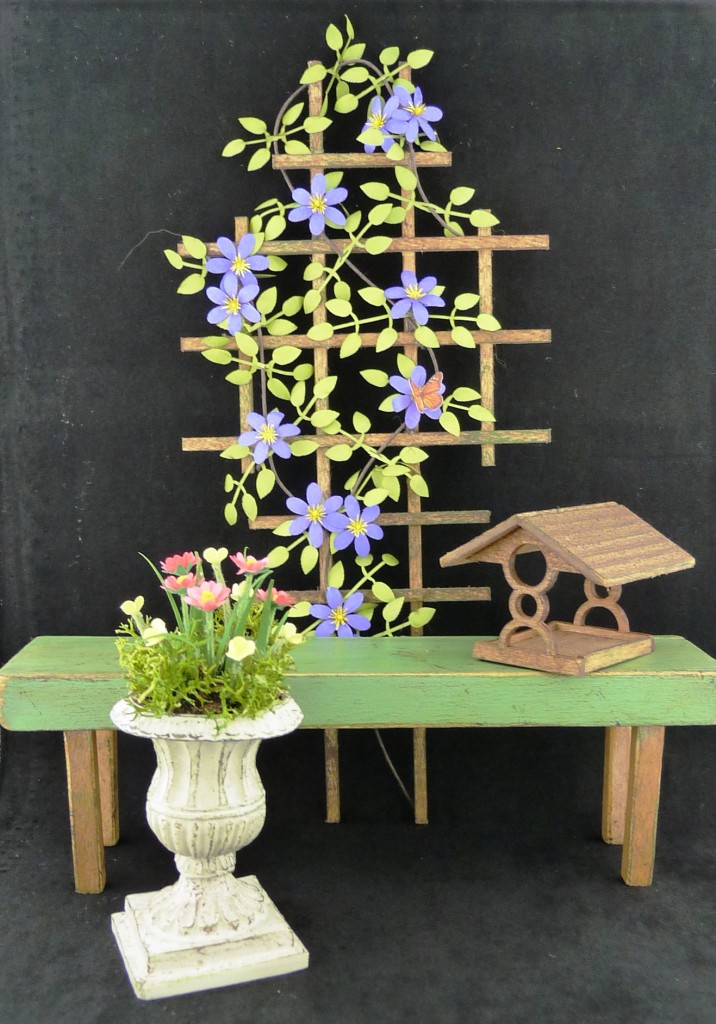
3. Stain the Bench pieces using a stain in a can – do not use the Stain Pens, these do not give an even coat on larger surfaces. (If you wish to paint the bench, assemble it now and paint it after the glue is dry. You can paint the top part and stain the legs as shown in the picture – glue together only the part you wish to paint.)
4. Stain the Bird Feeder kit pieces with a Stain Pen or stain from a can. Set aside to dry. (If you wish to paint the Bird Feeder, assemble it now and paint it after the glue is dry.)
5. Stain or paint the Wooden Trellis. Set aside to dry.
6. Paint the Chair and Stool with the acrylic paint color you desire. Set aside to dry.
Step 2. Assemble Wooden Kits
1. If you stained the Bench, assemble it and glue together according to the bench kit instructions. If you’ve already assembled it, paint it if the glue is dry. Set aside to dry.
2. Assemble and glue together the Bird Feeder Kit according to the kit instructions. Set aside to dry.
Step 3. Distress and Simulate Dirt, Age & Wear
1. Distress the Bench, Bird Feeder & Wooden Trellis (after the paint and/or stain is dry) using your emery board and sandpaper. Concentrate on the surfaces that would normally see the most wear: seat surfaces, edges and corners. Continue until you are pleased with the results – you can make them look as worn as you like!
2. Rub the Bench and Bird Feeder with a small amount the American Accents Antique Top Coat (make sure you stir it first). This will make the pieces look old and worn. Work in small areas at a time, and wipe off quickly with small white rag provided.
3. To simulate dirt and moss, dry brush the Bench, Bird Feeder, Wooden Trellis, Chair, Stool & Urn Planter with some or all of the following paint colors (your preference): Raw Umber, Burnt Umber and Avocado. Squirt a pea-sized amount of each color on some wax paper, and take turns with each color using a fan brush. Dip your brush into the paint, then wipe off most of the paint on a paper towel. Then, lightly and quickly brush on each surface until you are pleased with the results. Remember you can always add more, but it’s hard to take off! Set items aside to dry.
4. Spray items with Matte Sealer. Set aside to dry.
If possible, complete your painting projects before starting the flowers. I suggest cleaning your work area, taping down a new sheet of wax paper and washing your hands before starting the next steps.
Step 4. Clematis Flowering Vine & Trellis
1. Complete the Clematis Flowers according to Bonnie Lavish’s kit instructions. TIPS: Cut wire at an angle when you cut the stems. Enlarge the holes in the flowers by carefully inserting your T-pin through the centers (work on the foam pad). This will make it easier to slide them up the wire stems. Make sure you curl the flowers and leaves on the foam pad as she describes – I use the handles of my small scissors. Set in floral foam to dry as you complete each flower.
2. Shape the brown wire from the kit around the Wooden Trellis as you desire. Take the wire off the trellis and after curling the leaves, slide them up the wire as described in the Clematis kit instructions.
3. Glue the vine wire on the Trellis. Make sure the wire hooks around the back of the Trellis in two or three spots, so that it does not pop off. You may also wrap some scrap wire around the vine wire and the trellis in one or two spots. Hide these behind some leaves.
4. Glue the leaves down to the trellis here and there – they do not all have to be glued down.
5. Cut the Clematis flower stems down to ¼” – ½” long. Carefully bend each of the wires parallel to the flowers, then dip each in tacky glue and glue to the vine wire as you desire.
6. Set aside to dry.
Step 5. Flower Arrangement in Large Urn Planter
Pink Daisies (Five Stems)
1. Using scissors, cut from the cloth-covered green wire 5 pieces measuring approximately 1” long. Cut these at an angle so it is easier to slide the petals up the stem. Dip each wire end slightly into tacky glue so the cloth won’t unravel – do not leave a glob of glue on the ends, though.
2. Taking one length of wire, dip one end in Cadmium Yellow paint, then into the yellow sand. This is for the center of the pink daisy. Insert stem in block of flower foam to dry. Repeat for 4 stems. Do not make the centers too big.
3. On the foam pad, using the corsage pin, carefully pierce a hole in the center of a pink daisy punch. Slide the daisy punch up the corsage pin to enlarge the hole. Remove the daisy punch from the pin. Repeat for the remaining daisy punches and the green star punches.
4. Take one of the stems with the yellow centers, and place a dot of glue under the center. Using tweezers, slide a daisy punch up the stem, until it meets the center. Be gentle so that you don’t pull the center off the stem.
5. Place a dot of glue under the daisy punch, and slide a second daisy punch up the stem, until it meets the first. Use your tweezers to adjust the daisy punches so that the petals are evenly spaced.
6. Place a dot of glue under the second daisy punch. Slide the green star punch up the stem, and press gently against the petals. Insert stem in block of floral foam and let dry.
7. Repeat for remaining 4 stems with the yellow centers.
Yellow Buttercups (Six Stems)
8. Using scissors, cut from the cloth-covered green wire 6 pieces measuring approximately 3/4” long. Dip each wire end slightly into tacky glue so the cloth won’t unravel – do not leave a glob of glue on the ends, though.
9. Cup the 6 yellow flower punches on foam pad with stylus or blunt end of a toothpick. Use tweezers to dip the bottoms into tacky glue, then attach them to the ends of the wires. Insert stem in block of floral foam and let dry.
Arrange in Urn Planter
10. When the flowers are assembled and drying, cut the black flower foam into a small circle to fit the urn planter. Glue in place with tacky glue. Cover the foam with glue and press in the “dirt.” Tap the urn over your wax paper to rid it of the excess dirt. Glue in more dirt if needed.
11. Immediately after step 10 (before the glue starts drying), insert the daisy and buttercup stems into the foam in an arrangement that pleases you. You may have to cut some of the stems to shorter lengths.
12. Cut 10 long, thin, triangular leaves from the small piece of green paper (this is rice paper painted with Medium Hauser Green acrylic paint). Slightly curl these on the foam pad. Glue two leaves on either side of the pink daisy flower stems.
13. Glue very small pieces of green lichen around the yellow buttercups as desired. Set urn aside to dry.
Step 6. Jeannetta Kendall Butterfly
Trim the excess gray paper off of the butterfly. Fold in half and open again. Carefully glue on the antennae. Glue the butterfly on a Clematis flower on your trellis, or on a daisy in your urn, or on the birdfeeder.
You are finished! I hope you enjoyed the project and learned some new skills. If you have any suggestions, corrections or comments, please let me know!
Copyright 2011 Kathryn Depew

