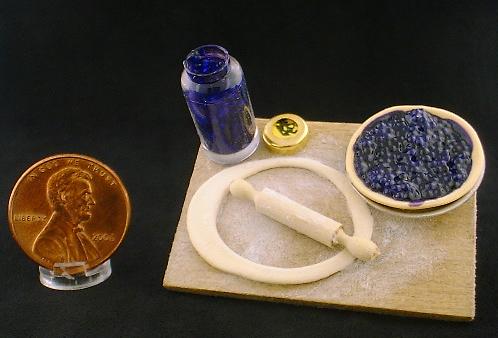
Miniatures & Supplies Required
Miniature Canning Jar & Lid
Miniature Pie Tin
Miniature Rolling Pin
Miniature Bread Board (cut your own from a basswood sheet: 1-1/4″ x 1-1/2″ x 3/32″ thick)
Tiny Glass Marbles (No-Hole Microbeads), ¼ tsp
Delta Purple or Gallery Glass Amethyst Glass Stain for Blueberry
Delta Red or other brand red Glass Stain for Cherry
Crayola Model Magic Air-Drying Clay (White)
Light Brown Acrylic Paint
Baby Powder
Wood Stain – your choice of color
Sandpaper
Tacky Glue
Paper Towels
Small plastic cup
Toothpicks
Clay Roller
2 oz cup with lid
Circle Cutter – 1″ or 1-1/8″ diameter (Craft stores carry these in the clay section and the cake decorating section.)
Instructions
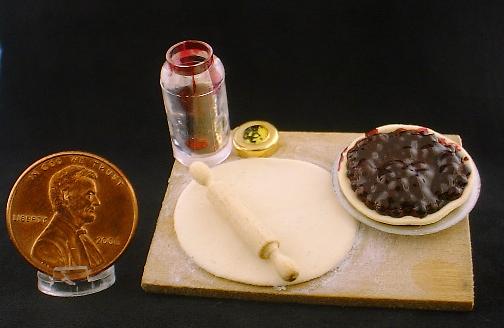
1. Make pie crusts – 1 rolled flat, 1 formed in tin. Mix a walnut-sized ball of Model Magic Air-Drying clay with a little light brown acrylic paint until it reaches the color of pie dough. Roll out very thin. Cut two circles with a 1″ or 1-1/8″ sized circle cutter. Form one into pie pan.
2. Lightly sand bread board. Rub a small amount of wood stain into wood with paper towel. Set aside to dry.
3. Using tacky glue, glue formed pie crust into pie pan.
4. In small plastic cup, mix glass stain with the tiny glass marbles until all marbles are well covered and mixture resembles pie filling. Using a toothpick, fill the pie crust in tin with the mixture, reserving a small amount for the canning jar.
5. Using a toothpick, put a small amount of the mixture in the bottom of the canning jar. Fill the jar with glass stain directly from the bottle. (As the glass stain dries, it will shrink and the jar will appear almost empty when dry.) Cover the marbles in the pie pan with additional glass stain.
6. With your index finger or tooth pick, smear a very light coat of tacky glue on most of the bread board. Sprinkle the glue with baby powder (to resemble flour) and tap down lightly with your finger.
7. Glue the flat pie crust in the lower left hand corner of the bread board, leaving room for the canning jar in the upper left hand corner of board. Smear a very light coat of glue on the pie crust and rolling pin. Sprinkle a light coat of baby flour over the glue and tap down lightly with your finger. Glue rolling pin to pie crust.
8. Glue canning jar to upper left hand corner of bread board, and the lid next to it. Glue pie tin with filled crust to upper left hand corner. Set completed board aside to dry. As the glass stain dries in the pie crust and canning jar, you may want to add more as desired. (Use the 2 oz cup with lid to carry your completed board if you completed the kit at a club meeting or round table.)
Copyright 2003 Kathryn Depew

