Materials Needed
To frost the cakes you will need:
- Round and rectangular wooden forms in one inch and/or half inch scales * and/or water and soda bottle caps
- Acrylic paint in “frosting” colors (chocolate brown, light pink, white, etc.)
- Structure Gel **
- Glitter (optional)
- Wooden stirring sticks
- Small plastic disposable cups
- Round wooden toothpicks
- Fun-Tak or similar temporary mounting adhesive
- Small medicine cups or Duplo toy blocks
* I find these in the wood crafts aisle in Hobby Lobby and Michael’s Crafts. You may also use dowels that have been cut to a 3/8″ to 1/2″ height. Town Square Miniatures makes a set of tiered round wooden forms for a miniature wedding cake and a set of tiered forms for a two-layer cake. If you are interested in these, please contact me and I may be able to order them for you.
** I used Galleria Acrylic Mediums’ Structure Gel, found in the oil/acrylic/watercolor painting supplies aisle in Hobby Lobby. You may use Modeling Paste instead, but since this dries with a matte finish, you will need to use a satin varnish on the cakes after the paint mixture dries and before adding flowers.
To decorate the cakes you will need:
- Vellum paper in various colors (including a leaf green color) ***
- Flower- and leaf-shaped punches, 1/4″ – 3/8″ in size ***
- Doily-shaped punches in various sizes to fit your cake forms ***
- White cardstock or vellum paper for doilies
- Stylus
- Foam pad such as a computer mouse pad
- Tacky glue
- Tweezers
*** I find vellum paper, flower punches and doily-shaped punches in scrapbooking stores and in Hobby Lobby and Michael’s Crafts in the scrapbooking aisle. I also use my Cricut Machine to make doilies in various sizes. Jeannetta Kendall Miniatures makes beautiful one inch scale and half inch scale miniature laser-cut doilies. If you are interested in these, please contact me and I may be able to order them for you.
Instructions
Frost Cakes
1. Glue multi-tiered cake forms together with tacky glue and let dry.

Miniature Cakes Tutorial – Cake Forms
2. Mount each wooden form on a block or medicine cup with Fun-Tak or other temporary adhesive.

Miniature Cakes Tutorial – Ready to Frost
3. Squirt approximately 1 tablespoon of Structure Gel into small disposable cup and add one teaspoon of acrylic paint. Mix well with stirring stick. Add more paint or gel to reach the consistency of frosting that will hold soft peaks.

Miniature Cakes Tutorial – Mixing Frosting
4. Using round wooden toothpicks, spread one layer of paint/gel mixture on each cake form and let dry.
5. Repeat Step 4, except use a generous amount of the paint/gel mixture and use the tip of the toothpick to form soft peaks and swirls.

Miniature Cakes Tutorial – Frosting Swirls
(It takes a little while to get the hang of this if you haven’t done it before. If you don’t like the end results, just wipe off the mixture and start with Step 5 again.)
6. Sprinkle with glitter (to simulate sugar decoration) if desired. Set aside to dry.

Completed Miniature Cakes by Kathryn Depew
Miniature Food Displays (Dollhouse Do-It-Yourself) by Sue Heaser
Decorate with Flowers & Leaves

Flower Punches and Vellum Paper
1. Punch various miniature flowers and leaves from the colored vellum papers.

Flower Punches and Vellum Paper with Stylus
2. Using the stylus on the foam pad, indent the middle of the flower shapes so the petals curl up slightly. Run the stylus across the leaf shapes to curl them slightly, also.

Leaf Punches and Vellum Paper with Stylus
3. Place a small puddle of tacky glue near your work surface (some of my friends use the back of their hands near their thumb!).
4. Using tweezers, pick up a flower shape, dip in the tacky glue, and place as desired on a cake. Repeat until you are happy with your flower arrangement, then add leaves. See the pictures in this tutorial or pictures of real cakes decorated with flowers for ideas. Repeat for each cake.

Miniature Cakes Tutorial – Making Doilies
5. Punch out doily shapes from the white cardstock or vellum (or use a Cricut Machine), and glue the cakes on the doilies. I find if I spread a thin layer of glue evenly over the bottom of the cake, the doily doesn’t warp as much as when I just put one dot of glue in the middle.
You are finished! I hope you enjoyed this project!

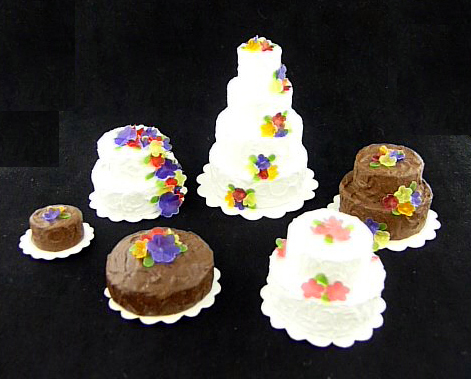
Completed Miniature Wedding and Other Cakes by Kathryn Depew
Copyright 2012 Kathryn Depew
Have you tried this project? Please comment below and leave your ideas and suggestions! Would you like to share your creation? Please contact me!
Related articles