Stoneware Clay Christmas Tree Ornaments
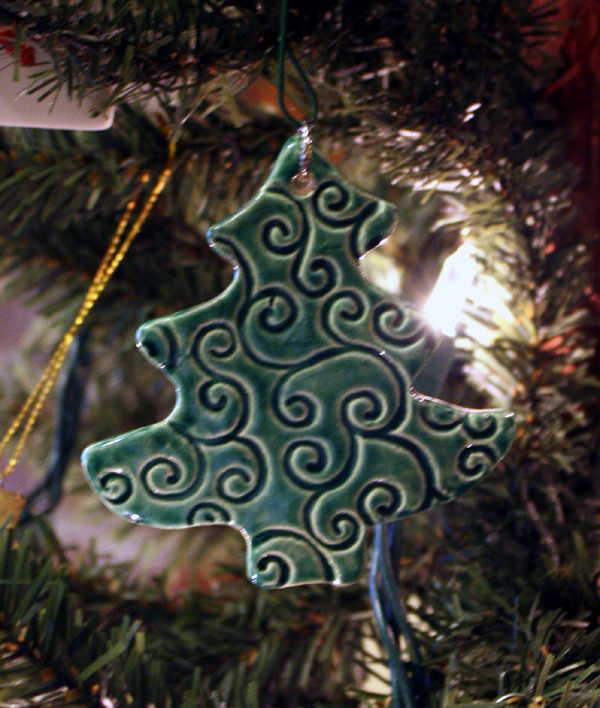
Making stoneware clay tree ornaments is much like making large pendants. When handling your clay ornament before it is dry, be sure to keep it as flat as possible to prevent warping in the kiln (try not to bend it or peel it up with your fingertips).
You will need:
- Soft Stoneware Clay or Low-Fire Clay
- Rubber Stamp or Other Texture Tool
- Tree Cookie Cutter (mine is about 4″ tall)
- Rolling Pin
- Thickness Strips or hardwood strips approximately 1/8″ – 3/16″ thick
- Wooden ware boards
- 1/8″ or smaller diameter drill bit
- Double Ended Pin and Carving Tool
- Kemper High Temp Wire 24 gauge (optional)
- Kiln Bead Tree or Bead Rack
- Cornstarch
- Glaze
- Kiln
1. Sprinkle your work surface with cornstarch (a wooden surface is ideal). (Note – this may mold in your clay bag if you have leftover clay. If this bothers you, you can skip the cornstarch.)
2. Roll out your clay on the cornstarch between the thickness sticks. Flip the clay over two or three times so both sides is lightly covered in cornstarch.
3. Impress the clay with the rubber stamp or other texture tool – use firm and even pressure, but don’t press down too hard or too far. It takes a little practice, and you may have to start over and try again a few times before you are happy with the impression.
4. Cut out the tree shape with cookie cutter. Carefully move to a wooden ware board to dry.
5. When it is almost leather-hard, use the drill bit to make a hole in the top of the ornament. Or, insert a loop of Kemper High Temp Wire 24 gauge.
6. Bisque fire, then glaze with your choice of glaze. (I used Cone 06 Green Sapphire by Mayco.)
7. Scrape out excess glaze from the inside of the hole with the Double Ended Pin and Carving Tool, then hang on a Kiln Bead Tree or Bead Rack and Glaze Fire according to the glaze manufacturer’s directions.
Copyright 2011 Kathryn Depew
Related articles
- I AM the Potter, You are the Clay (debbie915631.wordpress.com)
- 10 Simple & Fun Christmas Ornaments To Make (cottonridgellc.com)
- Pendants ~ Holiday & Themes (cottonridgepottery.com)
- How to Make Kiln-Fired Clay Pendants & Buttons (cottonridgellc.com)


