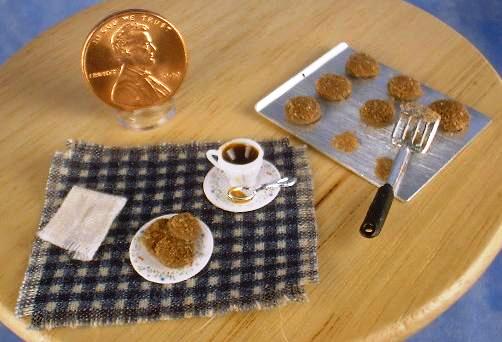
This was the first class that I ever taught, soon after I started Cotton Ridge Designs. I was very nervous, but the participants were very encouraging and had a good time! This was taught as a “Round Table” class in Birmingham during a regional convention. It’s a great little project for beginners and more advanced miniaturists will like it too. Feel free to use this for your next club meeting or round table – you can modify it to include your ideas and techniques.
Miniatures Needed
Miniature Cookie Sheet
Miniature Kitchen Spatula
Miniature Spoon, Dessert or Salad Plates, Teacup & Saucer
Additional Supplies
Crayola Model Magic white clay
Dark brown acrylic paint
Blue checked fabric
Cream fabric
Tacky glue
Scissors
Wax paper
Toothpicks
Scotch Tape
Brown craft sand
Brown Glass Stain
Resin (optional)
Non-Permanent Adhesive (Mini-Hold or Quik-Stik Wax Adhesive or Moveable Miniatures Glue)
Instructions
Tape a piece of wax paper 15″ long on work surface to protect it.
Mix dark brown acrylic paint into a small ball of Model Magic (about the diameter of a penny) until the color of molasses cookies. Roll clay into balls a little more than 1/8″ in diameter. Roll as many balls as you want cookies. Flatten with finger and set aside to dry.
Mix brown glass stain into resin according to manufacturer’s directions to make liquid the color of tea. Fill cup 2/3 full of the resin mixture.
Alternatively, you can fill the cup with brown glass stain a little at a time. The stain shrinks as it dries, so this will take several drops over a period of time.
Glue 6 cookies to cookie sheet, set aside to dry. Punch plates out of card and trim tabs with scissors. Glue 3 cookies to one plate, set aside to dry. Glue cup to other plate. Drip a small drop of brown glass stain on end of spoon and place next to cup on plate. As the stain dries it will adhere it to the plate.
Cut placemat out of blue checked fabric (1-1/2″ x 2″ rectangle). Cut napkin out of cream fabric 1″ x 3/4″ rectangle). Trim placemat so that edges are square with lines in the fabric. Fringe placemat by pulling 3-4 threads on each edge.
Fringe napkin by pulling 2-3 threads from each short edge. Trim with scissors so fringe is even. Fold long edges to center and finger-press. Glue to keep edges folded down. Fold in half and glue.
CAREFULLY bend spatula slightly at base of handle, so wide part is at a slight angle. Using toothpick , dab glue on cookies on sheet and plate, and on the end of the spatula. Put dots of glue where the three cookies would have been on sheet. (See picture.)
Sprinkle brown sand over glue on sheet, plate, and spatula, and press lightly with finger. Tap off excess sand. Glue spatula to cookie sheet. Using mini-hold wax adhesive or Moveable Miniatures Glue, attach plates and napkin to placemat. You’re finished!
Copyright 2003 – 2012 Kathryn Depew
Have you tried this project? Please comment below and leave your ideas and suggestions! Would you like to share your creation? Please contact me!


This would be great for my niece. She loves to pretend cook as well as help out with cookie time.