Miniatures & Supplies Needed
One inch scale Miniature Terra Cotta Pot or Porcelain Vase
Paperclay or Crayola Model Magic or other Air-Drying Clay
Green Lichen or Reindeer Moss
Woodland Scenics Fine Turf Soil or similar Soil Material, or dried used coffee grounds
Light Green Cloth Covered Wire
3/8″ diameter White or Orange Daisy Punches (made with a scrapbooking punch and white or painted orange rice paper)
1/8″ diameter Yellow Circle Punches (made with 1/8″ diameter circle punch & yellow cardstock)
1/4″ diameter Green Star Punches (made with 1/4″ diameter star punch & rice paper painted with Medium Hauser Green acrylic paint)
Cadmium Yellow Acrylic Paint
Tacky Glue
Corsage Pin
Tweezers
Block of Flower Foam
Foam Pad (such as a mouse pad)
Scissors
Flower & Leaf Punches
I use scrapbooking punches found in Hobby Lobby, Michael’s Crafts and scrapbooking stores. Look for in-scale punches in flower petal and leaf shapes – don’t forget to look in the “Border” and “Corner” punches section. I use colored vellum paper found at scrapbooking & craft stores and rice paper. Cardstock is usually too thick. For more details about punches for making miniature flowers, see my tutorial at this link.
I love these tweezers!
Instructions
1. Using scissors, cut from the cloth-covered green wire 5 or 6 pieces measuring 1-1/2” – 1-3/4” long. The measurements do not need to be exact.
2. Taking one length of wire, dip one end in a small dot of glue and touch to the very CENTER of one of the yellow circle punches. Dip top of circle in Cadmium Yellow paint for a very light coat – just enough to add a little dimension. Insert stem in block of flower foam to dry. Repeat for remaining stems.
3. On the foam pad, using the corsage pin, pierce a hole in the very CENTER of a daisy punch. Slide the daisy punch up the corsage pin to enlarge the hole. Remove the daisy punch from the pin. Repeat for the remaining daisy punches, and the star punches.
4. Take one of the stems with the yellow circles on top, and place a dot of glue under the circle. Using tweezers, slide a daisy punch up the stem, until it meets the circle. Be gentle so that you don’t tear the circle off the stem.
5. Place a dot of glue under the daisy punch, and slide a second daisy punch up the stem, until it meets the first. Use your tweezers to adjust the daisy punches so that the petals are evenly spaced.
6. Place a dot of glue under the second daisy punch. Slide the green star punch up the stem, and press gently against the petals. Insert stem in block of floral foam and let dry.
7. Repeat for remaining stems.
8. Fill pot almost full with paper clay or other air drying clay. Cover top of paper clay with tacky glue. Sprinkle glue with soil material, lightly press down with finger, and shake away excess onto paper plate.
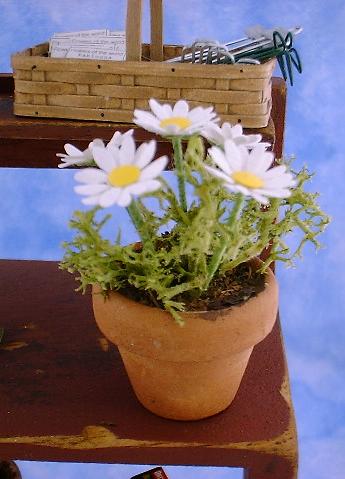
9. Using corsage pin, poke 5 – 6 evenly spaced holes into the paper clay/soil in one of the flower pots. Cut the 5 – 6 flower stems to desired length. Dip each stem end in glue and insert in a hole in the paper clay/soil. Glue in a small amount of green lichen for foliage. (Refer to photo.) Set aside to dry.

10. Alternatively, you can casually arrange the daisy stems in a miniature vase or tin bucket as shown in picture above.
Other Flowers
There are many scrapbooking punches that are sized perfectly for miniature flowers. I have found many ranging from $1.00 – $10.00 at my local craft and scrapbooking stores. Check out a book on flowers from your library and compare to the punches you find, and you’ll see that you can make many varieties of flowers using the method described above.
Copyright 2006-2012 Kathryn Depew
Have you tried this project? Please comment below and leave your ideas and suggestions! Would you like to share your creation? Please contact me!