
Build Your Own Jewelry Display
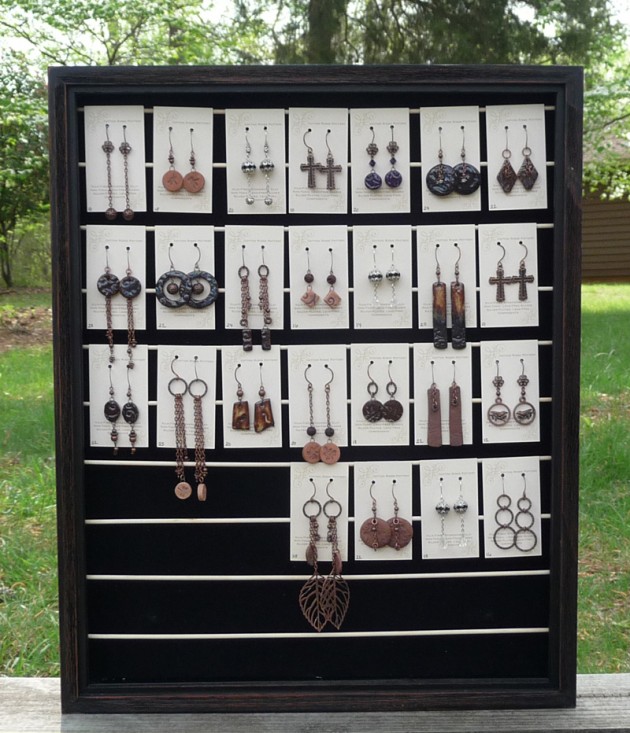
This earring display rack holds 35 vertical hanging business card-sized earring cards with earring card adapters on the back of them. You may also use standard earring cards, of course. Adjust the placement and number of dowels to best suit the size of card you are using.
I made the rack in about 2 hours from a shadow box found at Hobby Lobby (during a 50% off sale) for $27 plus tax. Especially considering the relatively low cost and short time investment, I was very pleased with the results. Please contact me with any questions or suggestions!
Items Needed
16 x 20 Shadow Box
10 Dowels, approximately 16″ wide x 1/8″ diameter (don’t cut yet)
Drill and 1/8″ Drill Bit
Utility Cutter or small saw (to cut the dowels)
Instructions
1. Remove the back from the shadow box (should be like removing the back of a picture frame0. Remove the glass by carefully prying off one or two of the supports. Re-attach the supports if you wish.

2. Measure down 1/2″ from the top on the inside of the box near the front, and mark. Measure 2″ down from this mark and mark again. Repeat until there are 10 marks.

3. Repeat on the other side of the shadow box. Be sure to measure carefully – if the marks are off even slightly, the dowels will be slanted.

Drilled Hole
4. Drill and 1/8″ hole at each mark. Cut a dowel to fit the top holes using a utility cutter or small saw. Cut so that the dowel is slightly too long, then fit it in the holes. Cut a small bit off, then fit again. Repeat until the dowel fits in the holes without warping.

Utility tool used to cut dowels
The Handmade Marketplace: How to Sell Your Crafts Locally, Globally, and On-Line
5. Repeat for the remaining nine dowels.

First Dowel Installed
6. Step back and look at the dowels in the shadow box, and make sure they are straight. If not, adjust your holes. Hang a few of your earring cards on the rack to make sure you like the look. If you need to re-drill, fill in the unused holes with black marker.


7. Once you are happy with the dowels, glue in place using wood glue or other adhesive. I used E-6000 because it was at hand, but this was probably overkill. Replace the back of the shadow box, hang your earring cards, and you are done!
A nice advantage of this rack is that it is not very heavy without the glass. You can pack your earrings in the display for transport to the show – just wrap it in plastic wrap or a towel and transport on its back!

Be sure to see the Jewelry Display Ideas For Craft Shows article for more ideas!
What If My Drill Doesn’t Fit Into the Small Space of the Shadow Box…

Wooden Furniture Plugs
A reader asked me what to do if her drill didn’t fit into the small space of the shadow box. One solution that I’ve thought of so far is to use furniture plugs similar to these (found at Hobby Lobby and Michaels). Keep in mind that I haven’t tried this yet, but I think it should work:
a. You’ll need two furniture plugs each dowel. Drill one hole in the middle of each plug instead of in the shadow box.
b. Measure your dowels very carefully and cut them to fit the shadow box. You may want to follow the steps below for one dowel before cutting the rest.
c. Glue one end of one dowel into one of the furniture plug. Repeat for the other end of the dowel. Then repeat for the remaining dowels. Let the glue dry.
d. Lay the shadow box down with the front side on the table. (The back of the box should have already been removed in a previous step.)
e. Glue one plugs/dowel combination into the shadow box at the top marks made in Step # 2.
f. Make sure it is straight, and repeat for remaining dowels. Let the glue dry and hour or two before moving the shadow box.
g. Stand the box up and make sure the dowels are straight, and fix any problems before the glue sets too hard.
Please let me know if you try this solution, and how it worked for you! If you have another idea, please let me know! Thank you for trying this project, I hope it works out great for you!

Copyright 2012 Kathryn Depew
Have you tried this project? Please comment below and leave your ideas and suggestions! Would you like to share your creation? Please contact me!
Related articles
- Jewelry Display Ideas For Craft Shows (cottonridgecreate.com)
- Make a Jewelry Display from an Artist’s Case (beadinggem.com)
- Innovative Solutions for Jewelry Storage (rentersinsurance.com)
- DIY Jewelry Display (leahdawnwilliams.com)


What a smart and elegant idea for jewelry display and beautiful jewelry, too! I added your tutorial to a pin board.
Lisa
Thank you, Lisa!
Hi Lisa
I love this idea and am very thankful for you sharing. I have done most of it but I am having difficulty drilling the first hole. My drill won’t fit in the small space. Any ideas?
Drill from the outside of the box.
so sorry thank you Kathie.
I think I have come up with a solution for you that shouldn’t cost very much. Please see the new section above under “What If My Drill Doesn’t Fit Into the Small Space of the Shadow Box…”
Thank you again for visiting my site and trying the project! Please let me know if you think this is a good idea, if it did or did not work, or if you came up with a different idea!
I love your idea and thank you for sharing. This will be an excellent way for me to display my handmade jewelry.
Thank you so much! I appreciate your visit and your comment!
Wow, I love this!! I have seen those shadow boxes at Hobby Lobby and Michaels and always wondered how I could possibly use them for displaying my jewelry!! Now I know!! Lol
I love, love, love this idea! I am going to make two for my own personal use. I have so many earrings I have made and have been searching for a storage solution. This idea is the perfect one because I can hang it on the wall and keep my earrings organized. Thanks so much for sharing!
You are welcome, Jenny, so glad you found this helpful! Thanks for visiting!
I did this, but attached some small hinges at the top and bottom and connected it to another shadow box so it opens like a book. It’s super awesome and travels well
This is a GREAT idea, thank you! I assume it would stand up on it’s own that way too! I’ve been trying to figure out a way to keep it from falling over. Thank you!
Kathie,
This might be what I have been looking for. I need a display for my hand made earrings. One question: How do you attach he cards to the dowels?
Hi Mary, thanks so much for visiting my blog! You need earring card adapters, something like these: http://www.etsy.com/listing/100190101/25-earring-card-adapters-self-adhesive-1. You can find them online at jewelry supply shops, Etsy, and Amazon.com (search on “Earring Card Adapter”). Hope this helps!
Kathie
Hi my jewelry design is called SRJ designs, and I’ve been in constant evolution for creating a way to store and carry my jewelry to shows. I was placing them on the trays in the canvas carry bag. I tried usiing small plastic bags, but to finish a show and put seventy pairs of earrings in bags was not a good thing. I see you’ve use those stick on hangers , instead of the ready made earring cards,